|
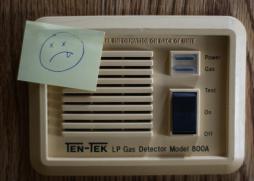
My old Ten-Tek 800A propane detector on the RV stopped working, announcing its failure with a continuous shrieking from its warning buzzer. It’s the type of detector that hooks into a solenoid-operated valve next to the propane tank so that if the propane detector isn’t happy it shuts off the propane, to reduce the risk of fire, explosion, death, and so forth. No propane, no cooking, no heating, no fridge, no kidding. Needs fixing. |
|
After a bunch of trying to fix the old unit, and a fair amount of trying to find a compatible replacement, and not always overburdened with good judgement, I decided to try building a new unit from scratch. |
|
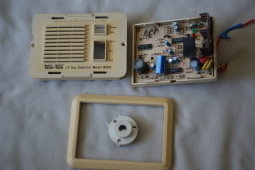
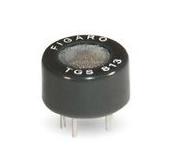
The original unit sports a Figaro TGS 813 sensor and various analog bits and pieces for voltage comparison. These sensors rely on a heating element to warm the sensor element and are known to have limited lifespan, of the order of 8 years or so. Mine was 25 years old so it had done okay. Having first ordered a replacement sensor to see if it would fix the unit, but without luck, I’m left with the sensor so might as well use it in the new unit. |
|
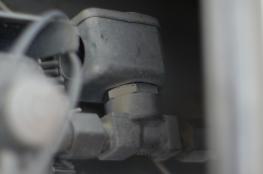
First step is to verify the propane solenoid on the RV still works. Seems to. Hooking the solenoid wires to my bench power supply confirms that it will open the valve at around 7V DC and will hold open all the way down to 0.5V DC. |
|
Checking the gas sensor datasheet suggests it should be straightforward to hook it into a simple microcontroller and I’ve got some spare AVR ATMEGA168 microcontrollers in 28-pin PDIP packaging (same chip as found in early arduinos) so I figure it’s a good starting point.
After some pondering, some figuring, some reckoning and then some experimenting, I come up with the following circuit: |
Schematic:
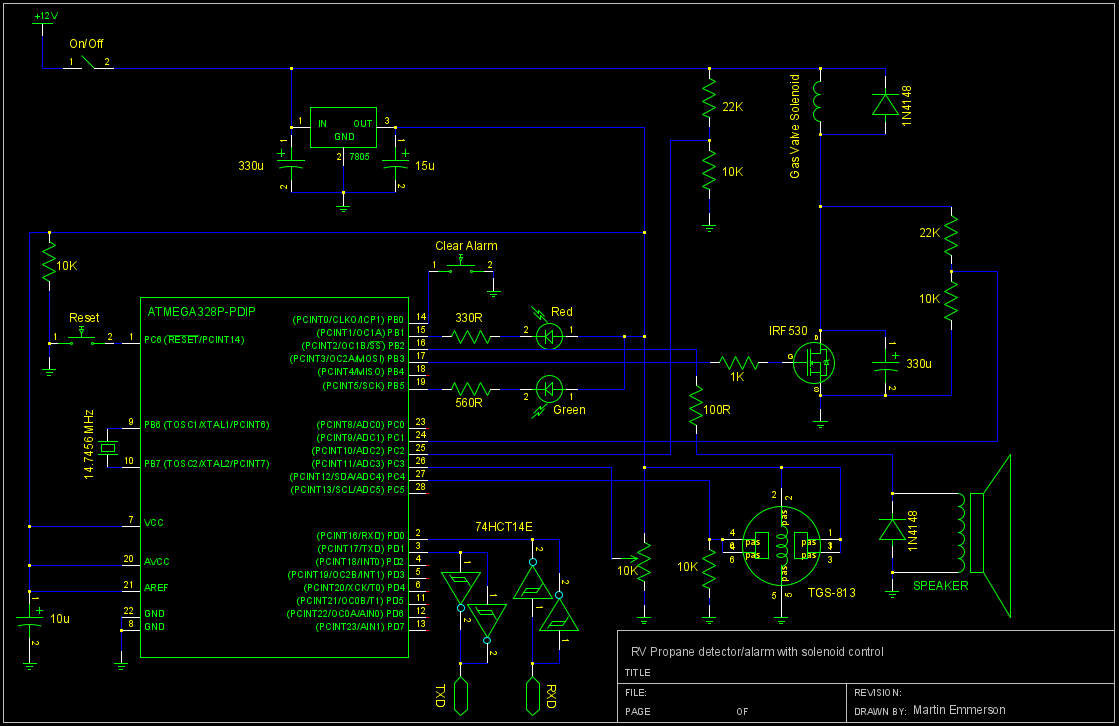
- Just as in the old detector, I decided to incorporate a green LED to indicate happy, a red LED for unhappy, a power switch, a piezo buzzer, and a reset button for clearing alarm conditions.
- The MOSFET is part of a buck power supply for the solenoid. By using PWM (pulse-width modulation) output from the AVR, the voltage across the solenoid can be controlled to allow high voltage to ‘pick’ the solenoid before reducing the voltage to ‘hold’ it open. This reduction saves battery power and also reduces the chance of burning out the solenoid by running it at full voltage continuously. There’s no separate inductor in the buck circuit because I figured the solenoid itself would provide plenty of inductance.
- The two voltage dividers (the 10K/22K resistors) are there to allow the AVR to read supply voltage and mosfet voltage. If supply voltage gets too low to reliably open the solenoid (and also to supply the 7V needed for the 7805 to provide a stable 5V output), the controller can decide to shutdown gracefully.
- The 74HCT14E interfaces between the host computer’s serial port and the AVR serial output, providing buffering between the voltage levels of the AVR and the host computer RS232 port. Needed during development for downloading code, and also handy for testing because it allows the AVR to send out its various input/output values as it runs.
- The trimpot is present to allow a calibration input for fine tuning the propane level that triggers the alarm condition.
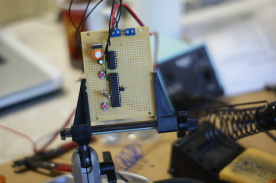
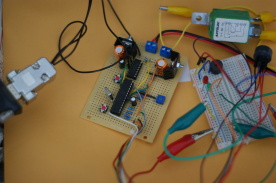
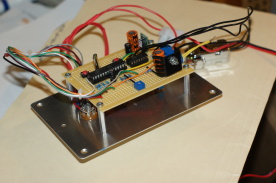
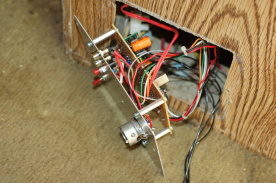
Construction:
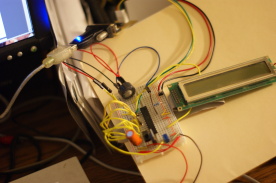
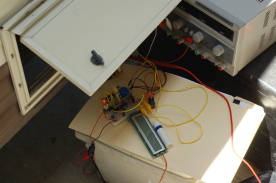
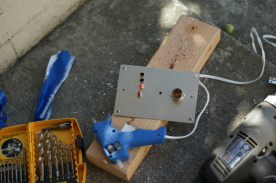
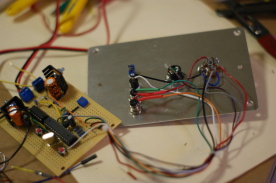
Proof of concept on a breadboard including a bunch of programming of microcontroller, followed by some testing and then some soldering. Then some more programming, some more testing, some more soldering. Then some drilling, fastening, gluing to build a faceplate. Then some more testing. After as much bench testing as reasonable, using a butane lighter to juice the gas sensor, it was time to connect to the gas solenoid. All seemed good so time to bolt it all together into a single piece for final test.

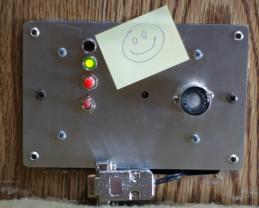 |
It powers up. Got the green light. Hear the propane solenoid click as it opens. Yay! |
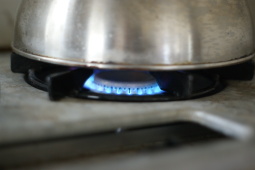 |
Propane flowing. Kettle on! Time for tea. |
Notes:
- Yes it could use a proper enclosure. It ended up as a temporary proof of concept that was good enough to put into permanent service. I might shoehorn it into the original enclosure so it looks better.
- Sure, the Atmega168 microcontroller is probably some overkill, but it’s what I had lying around and the extra pins were handy for driving the LCD display during development. Plus, with the gas sensor pulling 0.2A, there’s not a huge amount to be gained by using a lower-powered chip.
- Serial port, available for doing on-site dev/test/calibration if needed.
- I don’t really have any way to correctly calibrate the detector other than some simple trial and error. Having some experience with the old Ten-Tek unit, I believe the new unit is more sensitive to propane, at least under all temperature/humidity conditions I had available. As well as propane, the gas sensor is also sensitive to various other things, such as carbon monoxide, alcohol, other hydrocarbons. I managed to trigger it just by driving up a steep hill with the roof vent open. With the engine under heavy load and making slow progress uphill, enough exhaust fumes got into the rig to trigger the new sensor. This never happened with the old one so I may have to turn down the sensitivity a bit.
- Using a 7805 seemed like a fine choice for providing the 5V needed for the heating element in the gas sensor. It also supplies the AVR but the AVR could run happily at 3.3V, while the gas sensor spec is much more fussy. Trouble is, with the gas sensor pulling about 0.2A, and with an automotive supply voltage between about 12V — 15V, the 7805 is getting hot to the touch. I throw in a heatsink for good measure but it’s not a good use of battery power to be throwing away energy as heat even if everything is within tolerances. I discover a cute little drop-in buck-supply replacement for the venerable 7805 online for about $5 (Murata Power Solutions oki-78sr.pdf). Throw it in. No heatsink required as, unlike the linear 7805, this supply doesn’t rely on burning off the excess energy. Now the whole system draws 0.1A at 15V, while supplying the 0.2A at 5V needed by the gas sensor. It’s magic, I tell ya.
- Some of the photos show an LCD display attached to the circuit. During development I wanted to have the controller output its various input/output values and its internal modes. I took the display off for the final installed version.
- I’m not quite as insane as I might appear. Yes, I could have bought a new propane detector but it would come with an incompatible gas solenoid valve which would need to be installed in place of the old one. A lot of what I’m doing all this work for is to avoid disturbing the decades-old gas lines/fitting on the rig. Alternatively, I could get a cheaper unit that just does detection (ie no solenoid), but this would still leave me needing to remove the original solenoid to take it out of the system. Third option would be new detector and then I make a simple circuit to hotwire the gas solenoid open. Once I’m making a circuit to hotwire the solenoid then I might as well go the whole hog and make a proper alarm unit, figuring it wouldn’t take much longer (Ha! Now there’s some insanity).
- Heatsink on mosfet, probably not needed.
- The reset button shown on the schematic is only on the circuit board, not the front panel.
- Speaker is a piezo device. Not a buzzer; needs to be supplied with a frequency to make sound. Using PWM mode on the output pin. Piezo speaker itself is hotglued to the front panel.
- TGS-813 needs a old-style valve socket. Not always easy to find. Found a used one at a local electronics recycler. In a pinch could just solder directly to the sensor but it’s nice to have a socket. In theory, the sensors have a limited lifespan.
- The temp sensor (LM34) visible on the circuit board but not on the schematic is there because the gas sensor is sensitive to ambient temperature and I figured it might be nice for the controller to take the temperature into account. The gas sensor is also humidity sensitive but I didn’t have a humidity sensor handy. In the end, I didn’t actually use any input from the temperature sensor and got everything working fine without it.
- Yes, the front panel is ugly and poor fitting. It’s a first pass.
- I was so tracked into duplicating the original functionality that it didn’t occur to me to separate the LPG sensor (which has to be mounted low, because LPG is denser than air) from the control panel. Would be nice to not have to stoop to interact with the control panel. Oh well, maybe later. Plus, this is nice justification for why the current front-panel setup looks so temporary. Uh… yeah, that must be why. Sure. 😉
15 responses to “Repairing an RV Propane Detector”
get a life. looser!
Do you perhaps have a wiring diagram for this exact unit?
Do you perhaps have a wiring diagram for this the Ten Tek 800a gas detector?
I wish! If I’d had that, I could probably have repaired the original unit. I did spend some time trying to reverse engineer a schematic by following traces on the pcb but decided it would be more fun to build a microcontroller version instead. What problem are you seeing?
The unit itself seems to be working, I think. It is connected to a heater unit, hot water cylinder, fridge and gas stove. When you go to ignite the hot water cylinder, the gas solenoid then gets a voltage signal to it, but it is erratic, turning on and off constantly and not staying on. I have looked for a manual online, but no luck.
Hmmm. If the ten-tek unit isn’t sounding the alarm but the solenoid is shutting off, I’d suspect a bad/corroded connection from the ten-tek to the gas solenoid. If not, then a problem with the unit itself.
(I have the original owner’s manual but I’m not sure it would help you much. Assuming this unit used to work for you, but now doesn’t. The manual is light on technical details.)
Fascinating!
I accidentally flooded my 30-year-old Newtec LP gas detector, and now it won’t work. It was booting to a “unit malunction” (continuous tone) shortly after getting soaked, now boots to a silent condition, but does not activate the solenoid.
Luckily, an RV mechanic on site has a fitting and was able to remove and bypass my solenoid valve. That got my propane flowing, but with no detection protection at all.
Same challenge – you can’t get these old controllers any more (they say they should be replaced every 5-8 years anyway), and I hear the new ones won’t operate the old solenoids. So I will need a whole new kit, and the new controllers won’t even fit the hole in the wall correctly. A new kit will exceed $200!
I guess it may be a blessing in disguise, but that old unit worked great, it would even detect smelly sneakers! I will miss it. Do you think there is any hope it will work again after more drying, or could be repaired? It does not seem like it is designed to be taken apart…
Yup, that sounds like exactly the situation I was in.
I don’t know much about the Newtec unit specifically. I also don’t know if the 5-8 years lifetime presumes continuous usage of the detector, or just the passage of time whether or not the unit is used. Either way, the main reason for the short lifetime is the actual LP sensor itself. I’m guessing that this is probably the most sensitive to water damage. If you can pull the unit apart you could see if it’s in a socket for easy replacement; and also see if there’s any other visible water damage.
Good luck. Curious to know if you can find a good solution for a reasonable price. I sure couldn’t! It would be nice if manufacturers had standardized on solenoid size/fittings, and controller form factor so our rigs wouldn’t end up looking like Rube Goldberg swiss cheese over the decades!
(If you’re handy with electronics and are up for adventure, you can use my design as a starting point, but I can’t recommend it as a practical approach because it would be simpler to just buy a new detector unit and shoehorn it into place, and hope that you’re nearby if there’s a leak.)
I am not quite that adventurous, so I paid the big bucks for a whole new kit of detector/controller and solenoid/valve. I wanted protection for an unattended pet. One upside is the new detector senses carbon monoxide in addition to propane. Oh, and the modern units have no power switch and can’t be turned off. Another reason for me to unhook the battery for storage, I guess. I am paying big time for my mistake, and having Camping World do the work, I just don’t feel comfortable working on the propane system. The new unit does not fit the opening, I have not seen their work yet, I hope it looks nice. I was in awe when I found this blog, and I applaud you making your own unit!
Thanks!
Probably a good decision to get the new combo unit with solenoid. I’m a big believer in auto shutoff for the gas if propane is detected, especially because of the unattended pet.
Which brand/model did you get? I hope Camping World do a good job shoehorning it into the old opening. You could post a followup to serve as a recommendation or a warning for fellow travelers!
Oh, wow, have I opened up a massive can of worms on this 1989 27′ C Class Minnie Winnie (on FI 460 Ford E350 Cutaway)!
In retrospect, I wish I had just left the fitting in place that the friendly mobile RV repairman installed on site the day after I ruined my LP detector. He bypassed my solenoid valve and gave me propane again…
But I foolishly went to Camping World and bought the top-of-the-line “Saf T Alert” detector / solenoid valve kit (70-742-R KIT). I learned the hard way why it said about 17 places: “Do NOT to reuse the old solenoid valve!”…
The moronic design of this new kit applies a full 12 VDC to the “solenoid” valve at all times to keep it open! The stupid thing actually runs hot to the touch, and even bears warning stickers that it be hot during normal operation!
Why is this totally idiotic? Because at 12 VDC and allegedly 1 A, the continuous 12 W load needed simply to keep your propane fridge running KILLS YOUR COACH BATTERY in a matter of a couple days, even with no other loads, and a brand new coach battery!
But that’s not even the tip of the iceberg of my frustrations.
Much to my misery, Camping World introduced a propane leak into my system! After picking up my motor home with freshly installed LP detection / solenoid valve system, I chose to do a couple hours of work on my RV in their parking lot before leaving.
I smelled a propane leak, which after I still observed before parking it at storage, I took the RV straight back to Camping World.
They took weeks, finally claimed they found a new fitting they installed was cracked, and said it was repaired. I picked up the motor home and took it home. While working on it at home, I smelled the propane leak (exterior) again.
Even though Camping World had told me when I last picked it up that if I had any future leak issues, I would need to take it to a propane dealer, I took the motor home back again. I decided I could not tolerate a system that would force me to run a generator just to charge batteries to keep a solenoid valve open to supply propane to keep my fridge on when dry camping. With nearby neighbors and tournament golfers nearby, I just don’t have the option of running a noisy smelly generator at all, let alone, for hours per day.
The part that really frustrated me was that my original system used a smartly designed system, with real solenoid, (9V to kick, 1.5 to sustain), and was not a threat to my battery life.
Camping World’s “answer” was to install a cutoff switch that kills the whole system, but of course that shuts off the propane, which is helpful for storage, but does not resolve my original problem.
I returned the RV to Camping World again, and demanded they remove the solenoid valve entirely, and refund me the difference. They kept it for weeks again. When they finally called me to come get it, they presented me with not a refund, but yet another bill. They claimed they had repaired the propane leak, and it was the regulator (they replaced it). I checked it out today in their parking lot, and though it was windy, I only detected the very faintest whiff, not the more noticeable smell from before.
I did not pay the bill, but went back in later to pay it, and the service supervisor who said he was going to waive the labor charges was gone, and the lackey who remained said he could not waive them, but urged to to return tomorrow as I had planned anyway. It will cost me logistical time and mileage to catch the supervisor tomorrow, but I am going to go give them heck one more time, and see where I can get, and be done with them once and for all.
I wished I had listened to that little voice that told me that big old Camping World would not give a care about me and my little 25-year-old Minnie Winnie, since I was not driving some 6-figure big rig and my pockets did not look deep enough (sorry, no economic offense meant to any class).
Besides, I have well over $650 into this now anyway (see above: “I wish I just left that fitting in there bypassing the valve”), and am now going to hire this man: http://timsrv.net/ and hope hope hope he steers me right. He did hear out my entire sob story on the phone, and was still willing to make an appointment come and see me. this Thursday, so I will try and get back and update this chapter.
It always starts out for me with the most noble intentions: I wanted my wife, and our pets, to be as safe as possible. If I die in a motor home propane explosion, oh well, but I, don’t want my family to go out that way. My thought process was that if there is a propane leak, and the furnace is on, and our dog is in the motor home, but we are out at a restaurant, the alarm will sound, but the dog cannot wake up, go outside, and shut off the propane, so a valve that does it for her would be worth the investment.
But not if it kills my battery when I go camping for a tournament where there is no power and it it is not cool to run your generator!
As far as shoehorning it in, they actually did a pretty nice job, as well as with the switch, the valve, and the regulator (though they gooped dope everywhere, probably because they were tearing their hair out over the propane leak too).
(I have some photos to post (not sure how to do so, regular HTML tags? Flickr?) but would be happy to share them when I can make time.)
Thanks for your time, it has been relieving to at least type this all out.
Holy Toledo! What a nightmare. It’s a shame because I think you were doing everything right but just got hit by the worst surprises along the way. Disappointingly heavy power draw from the solenoid; does seem like an insane design. Doesn’t seem to be easy to get support for old rigs/equipment. Good luck! Love to see the photos if you can load them.
[…] homemade RV propane detector (see original post) has been working more or less okay since it replaced my ancient, broken Ten-Tek 800a. […]
interesting project, do you /anyone have the make / model / number of the reset button please
You mean the one from the original tentek unit, yes? I didn’t see any obvious marks on it last time I looked. It’s a bit of a nasty custom-looking beastie. Is yours physically broken or just has dodgy connections? You might be better off trying to salvage/service the old one rather than trying to find a replacement. Or just jury rig an external switch to do the job (Ugh).